


As a developer, what I love to do the most is coding. The more I spend time coding, the more I am happy. For that purpose, I have a special affection for services that can manage my apps' underlying infrastructure and deployment processes on my behalf.
In this article, I will share one of the numerous AWS services that serve that purpose: AWS AppRunner. You will see what AppRunner is and how it can help to deploy your .NET apps on AWS.
Prerequisites
If you want to realize the project in this article, you will need:
An OS that supports .NET (Windows/MacOS/Linux)
.NET 6 SDK (older or newer versions should work too)
A code editor or IDE (Recommended: Visual Studio Code with the C# plugin, Visual Studio, or JetBrains Rider).
An AWS Account. A Free Tier account should suffice for this article.
An AWS User with programmatic access.
AWS CLI, Version 2. For the installation, please follow the user guide.
GIT
A GitHub account
What is AppRunner?
AppRunner is an AWS service that helps to deploy your code simply and securely on AWS. The major advantage is that it will provide all the resources needed on your behalf. It will connect to your source code repository or your container image registry and set up a fully managed deployment pipeline for your app.
In addition to automatic deployments, AWS AppRunner can help to set up other exciting services, such as load balancing and auto-scaling. It also comes with built-in CloudWatch integration for logs and metrics.
If you want to know more about AppRunner, see the official AWS Documentation.
AppRunner in Action
In this article, you'll learn how to deploy an ASP .NET 6 minimal API on AWS with AppRunner. From your repository on GitHub, AppRunner will internally deploy your code in a docker container and will set up a deployment pipeline for you. AWS manages the services, meaning you don't even need to care about them. Let's dive in! 💻
Create your app
First, create a .NET 6 minimal API project. Open a terminal and run these commands:
dotnet new web -o apprunnerdemo
cd apprunnerdemo
Your .NET Web API project is created. You can run it with this command:
dotnet run
In your terminal window, you should see an output similar to this:
Building...
info: Microsoft.Hosting.Lifetime[14]
      Now listening on: https://localhost:7008
info: Microsoft.Hosting.Lifetime[14]
      Now listening on: http://localhost:5269
info: Microsoft.Hosting.Lifetime[0]
      Application started. Press Ctrl+C to shut down.
info: Microsoft.Hosting.Lifetime[0]
      Hosting environment: Development
info: Microsoft.Hosting.Lifetime[0]
You should be able to see a basic .NET 6 API displaying Hello World! at the link mentioned in your terminal window.
Now you successfully created your app, you will push the code on GitHub. Let's set up a Git repository.
Set up a Git repository
In this step, you will step up a Git repository locally and remotely on GitHub. First, initialize an empty Git repository in your project. Run this command:
git init
Now, create a gitignore file and commit your changes:
dotnet new gitignore
git add .
git commit -m "my initial commit"
Now, you need to push your code on GitHub. Run this command below:
git push [GITHUB_REPO_URL] [BRANCH]
GITHUB_REPO_LINK: Your GitHub repo URL. Mine is https://github.com/danylaws/apprunnerdemo
BRANCH: The branch you want to push on.
Your source code is now on GitHub. Great! Now you are ready to deploy your code with AWS AppRunner. Let's move to AWS!
Deployment with AppRunner
The AWS Console provides all you need for the deployment. In the search field, search for AppRunner. If you don't have AppRunner services already running, you should see a page like this:
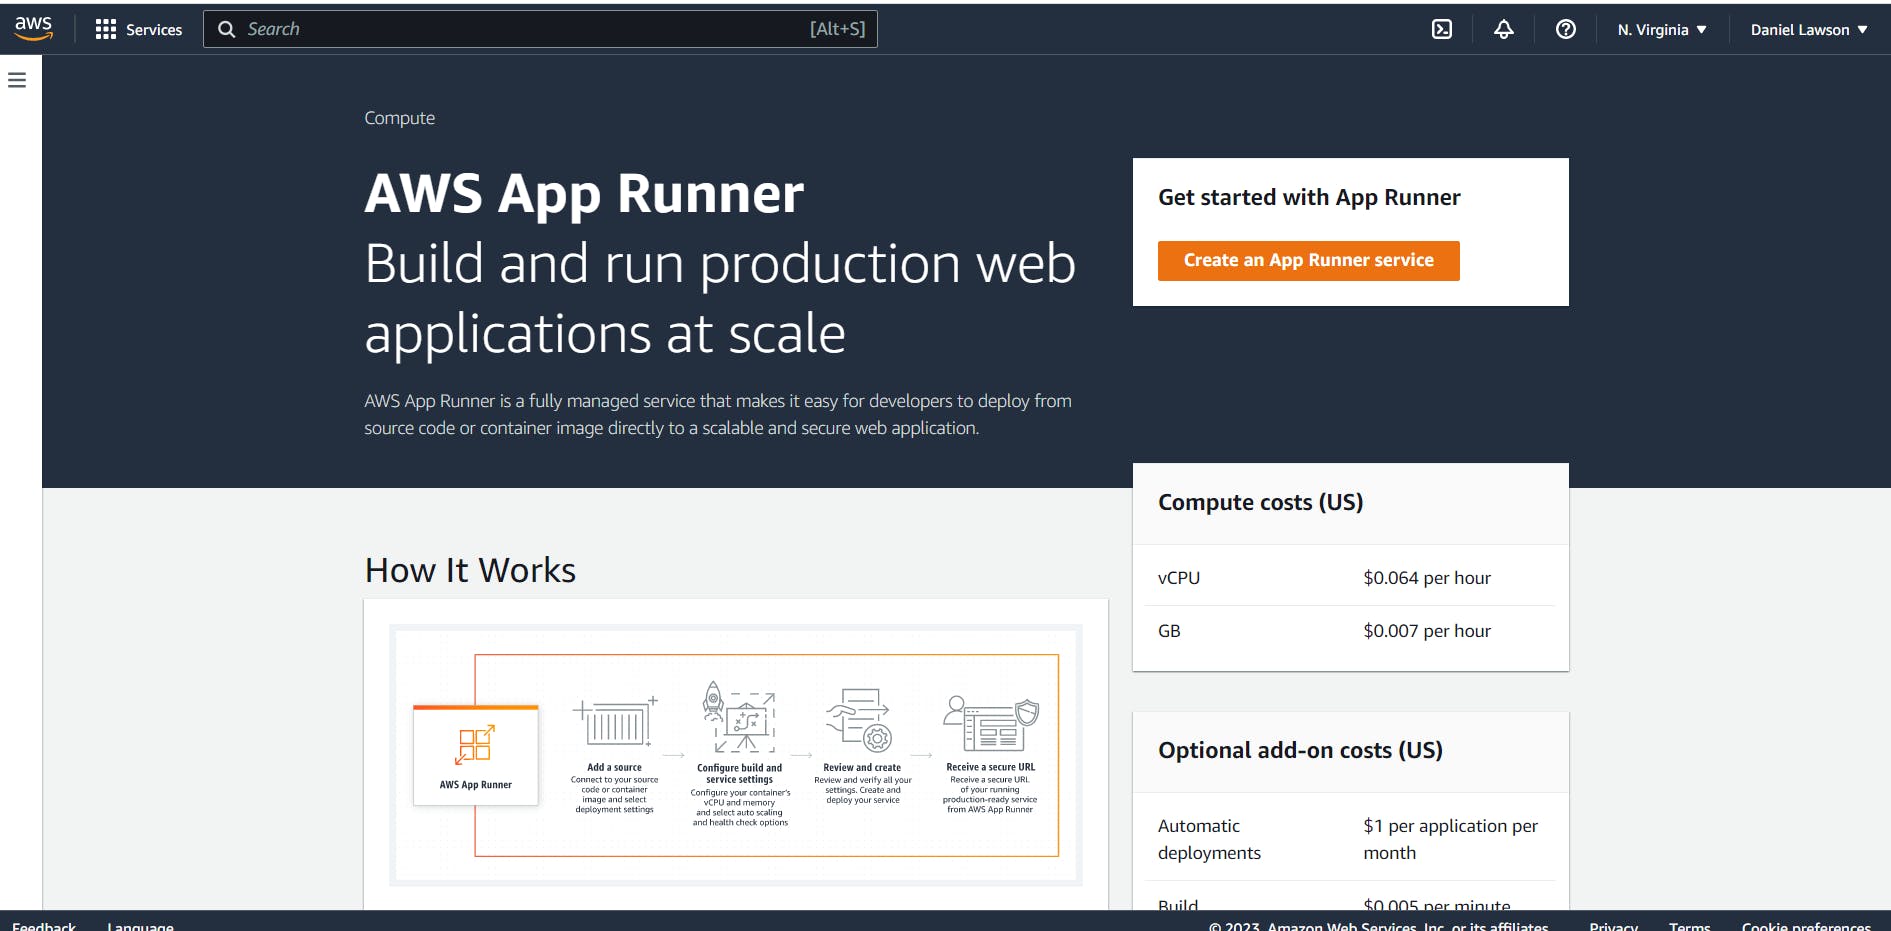
Click on Create an App Runner Service button. The creation page looks like this:
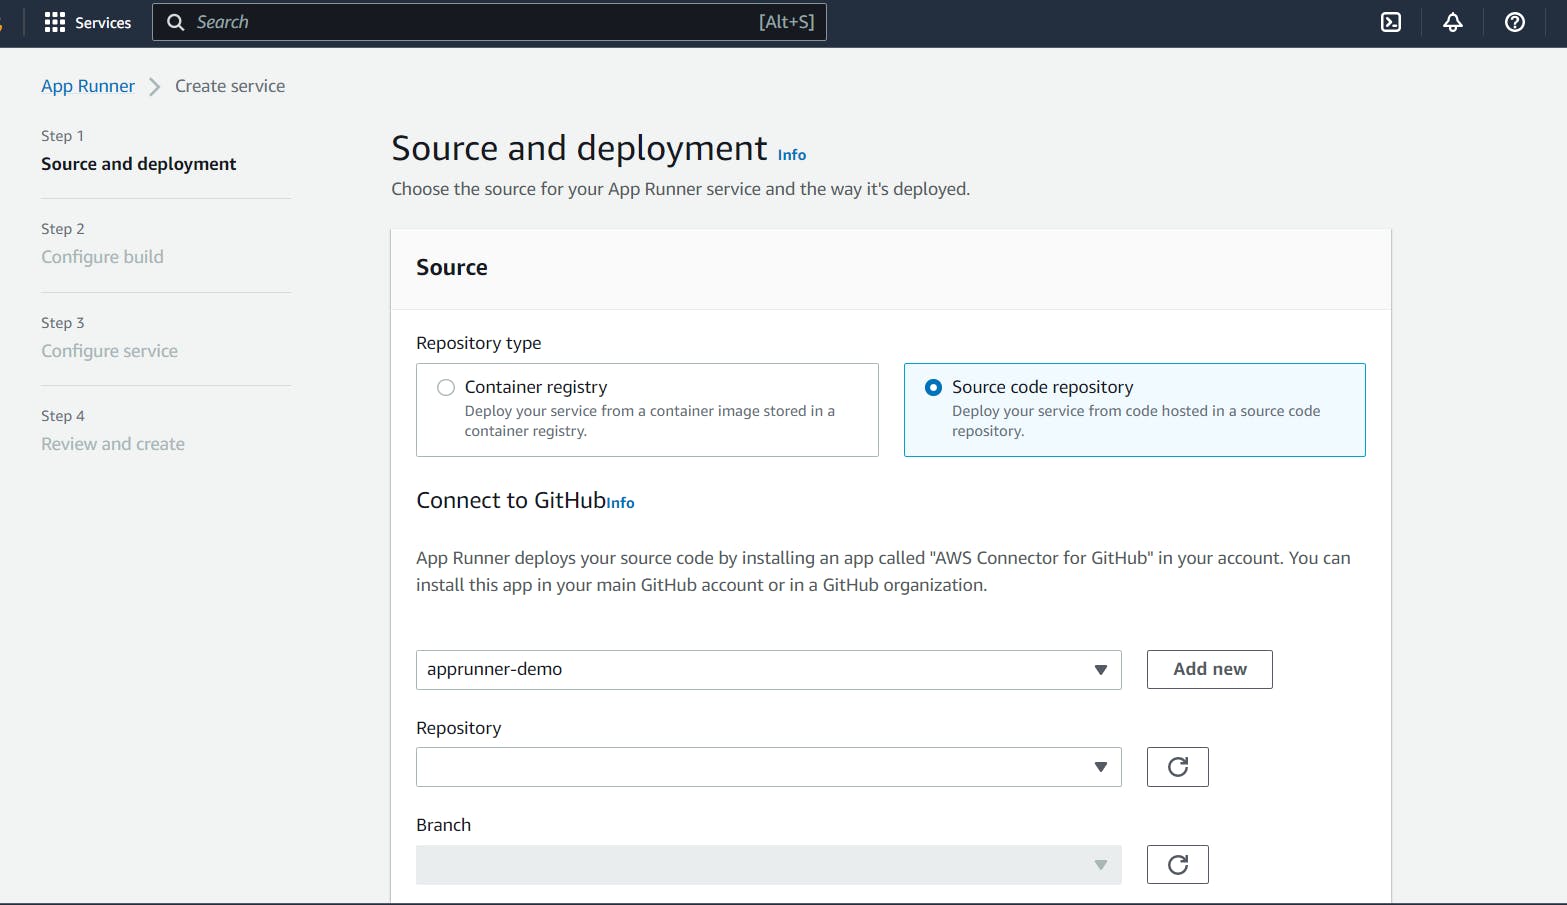
In the Source section, select the Source code repository option. Then you'll need to connect to your GitHub repository. Click on the Add new button. A pop-up page is opened. Set a name for your connection and Click on the Install another button.
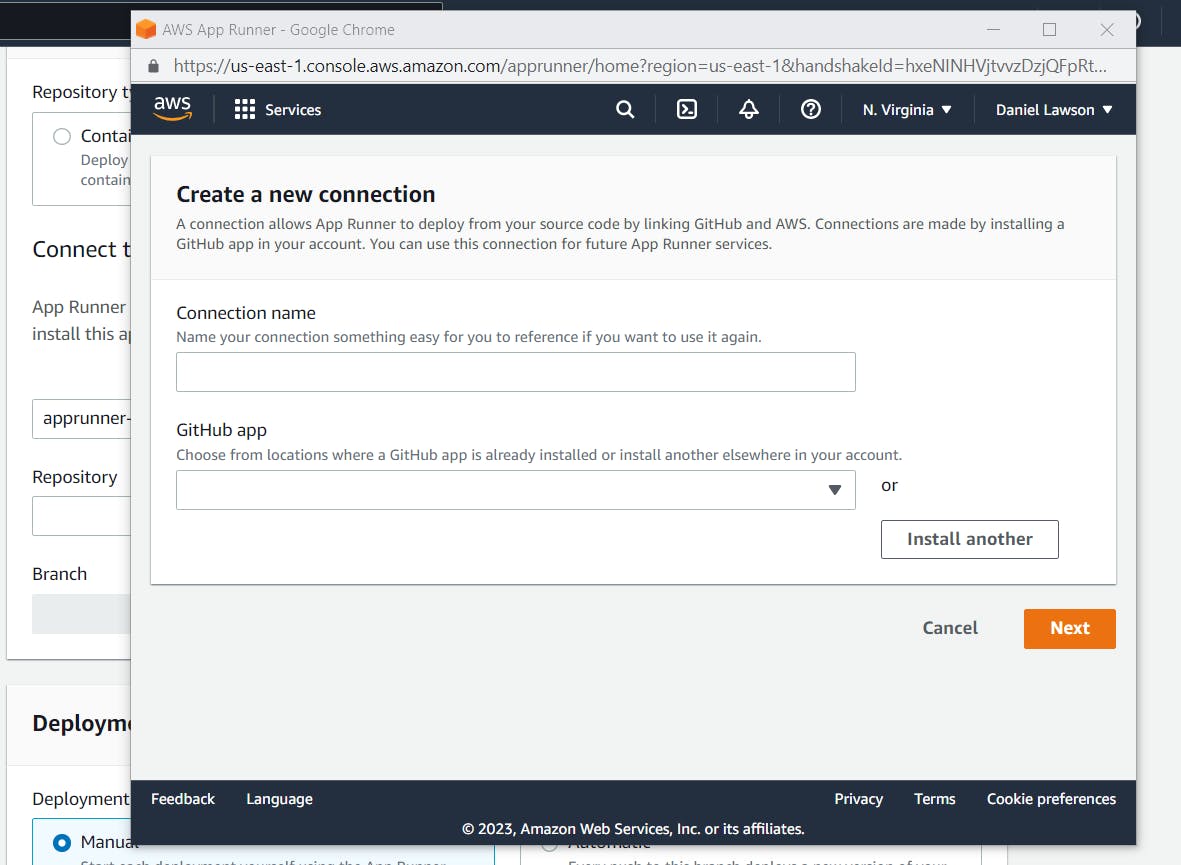
AWS will install a Connector for GitHub. It will ask you to enter your GitHub credentials and the repository you want AppRunner to connect with. If everything goes well, you will have a success message on the AWS Console. Now you can select your repository and the branch you want to deploy. In my case, I have one single branch named master.
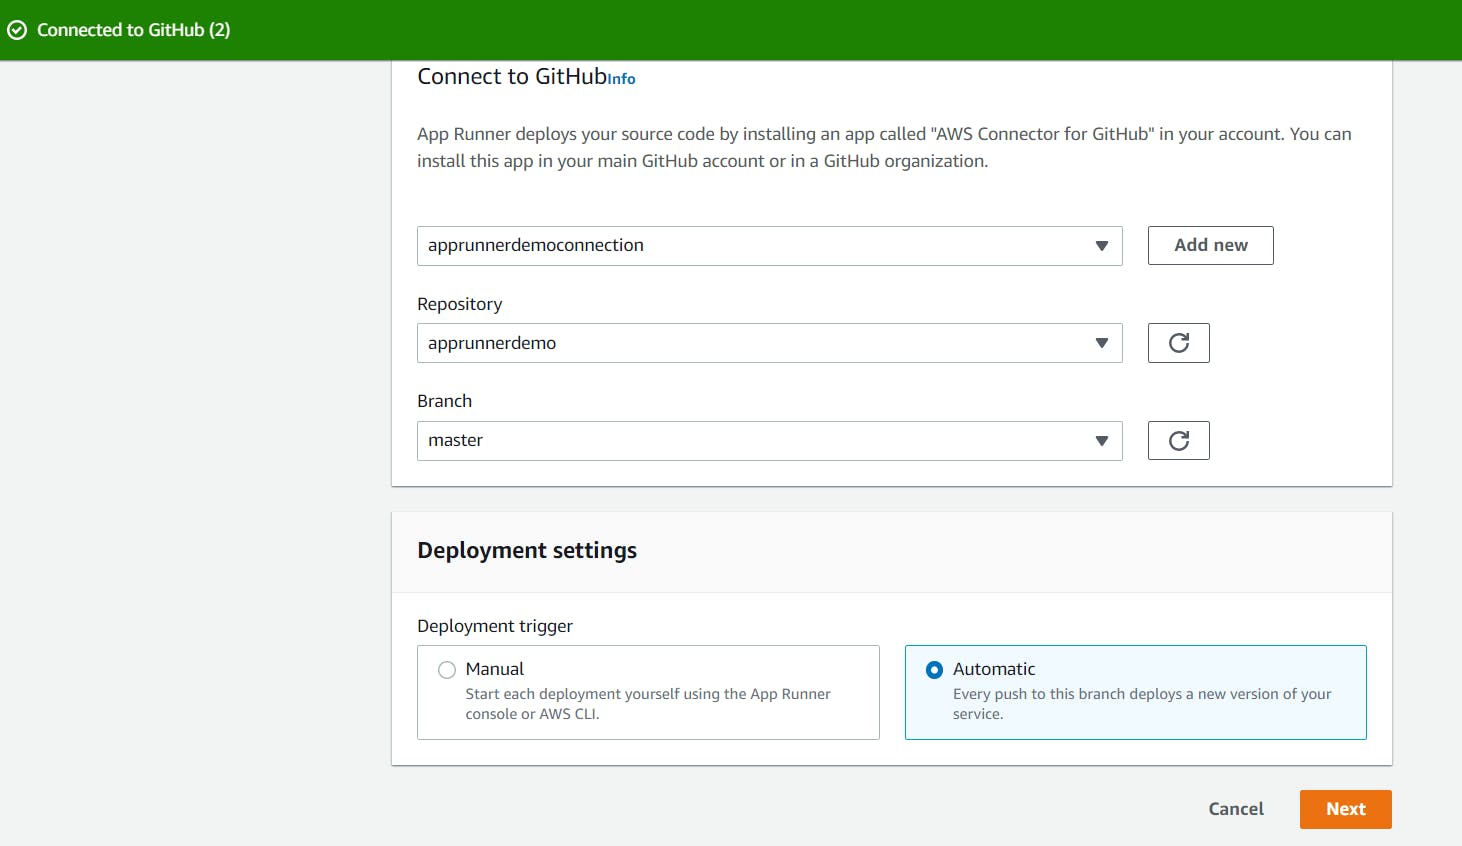
In the deployment settings, choose the Automatic option, as shown in the previous screenshot. It is the key option that will set up the deployment pipeline. Every push on the selected branch will trigger a new AppRunner service deployment. Click next.
Now it's time to configure your build settings. AppRunner will use these parameters to build and start your app in the underlying Docker container. Here are the configuration settings, with their values, specific to your app:
- Runtime:
.NET 6
Your app will be published with the .NET 6 runtime.
- Build Command:
dotnet publish -c Release -o out
This command will publish your app in release mode in a folder named "out"
- Start Command:
dotnet out/apprunnerdemo.dll --urls=http://0.0.0.0:8080
this command will start your app on the 8080 port.
- Port:
8080
The port AppRunner will expose. It must be the same port as the one your app will start on, which is specified in the start command.
Now that you configured your deployment settings, you can move to the service settings page. Here, you will give a name to your AppRunner service. There are other settings like the vCPU memory, health check, networking, and so on. For the sake of simplicity, leave the default values and click next.
The last page is a review page. Here you will check your settings one last time before the deployment. Click on the Create and deploy button, which will trigger your service deployment process, as shown below:
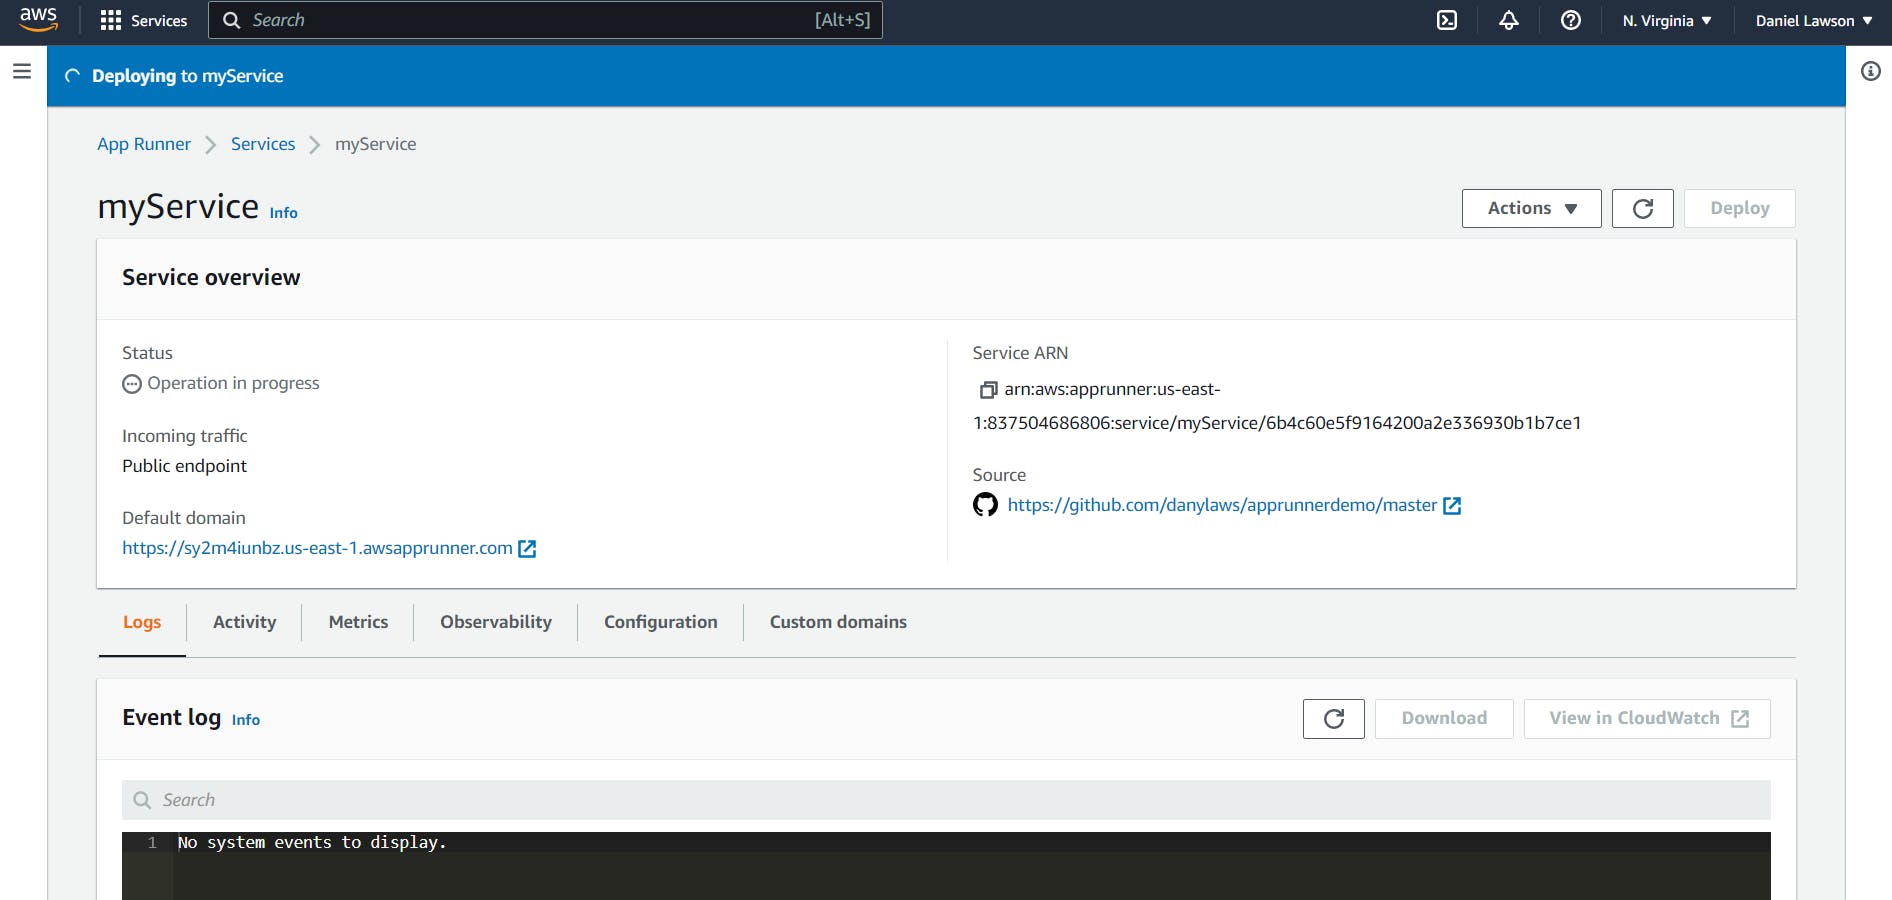
It will take several minutes for AppRunner to deploy your application. After that, the status turns into Running and a message indicates that your app is successfully deployed. All the deployment steps are logged in the event log. You can have more details in CloudWatch by clicking on View in CloudWatch button. Yay! 💪🏾
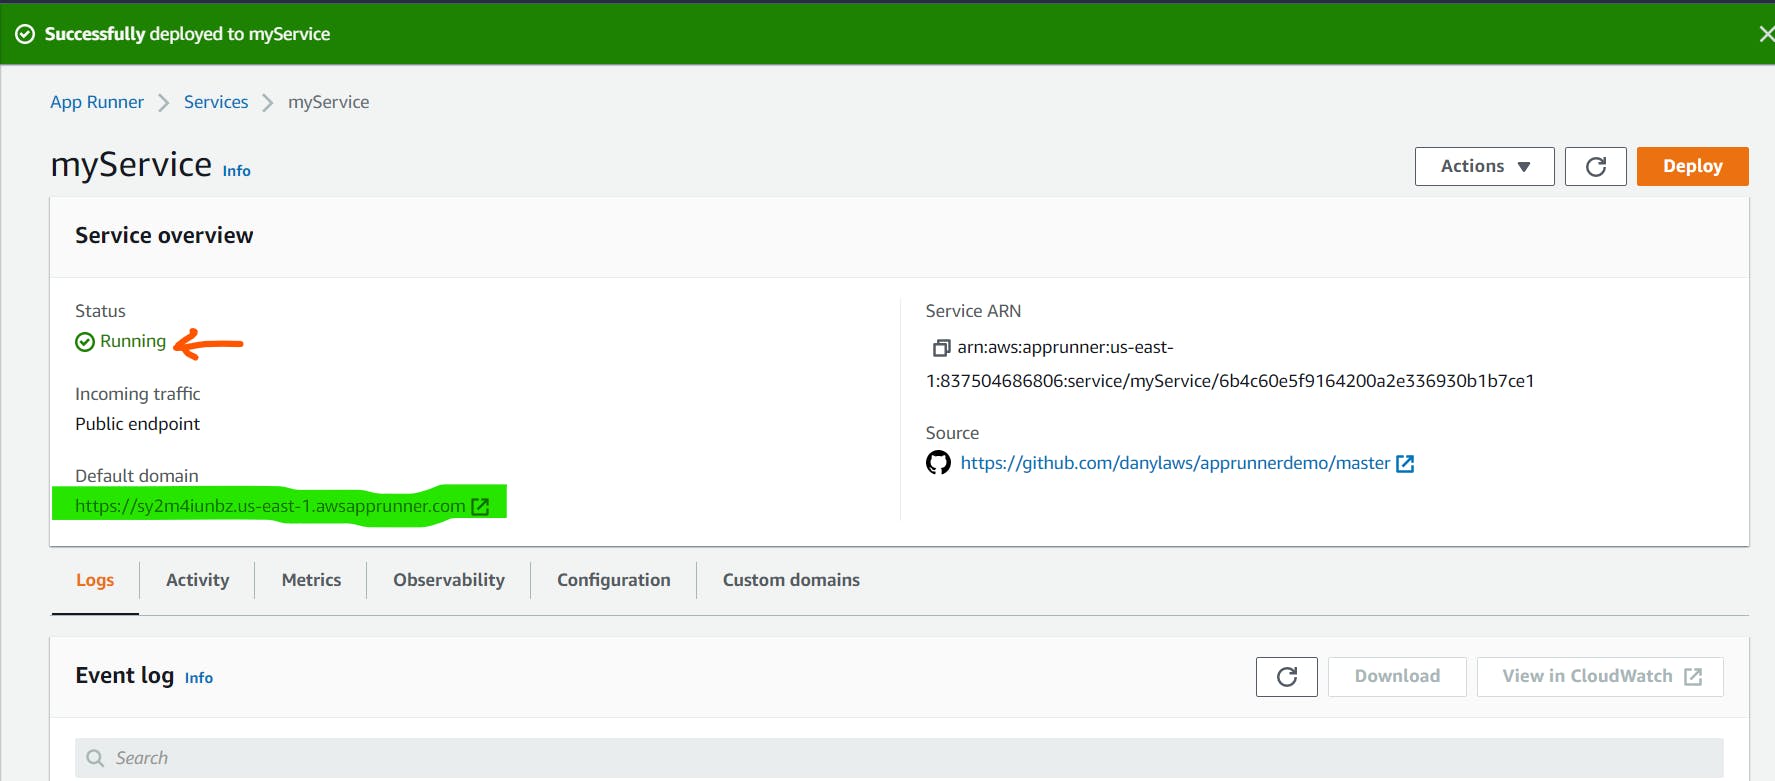
AppRunner sets a default domain for your application (highlighted in the previous screenshot). When you click on the link, you should see your "Hello world!" message displayed on the screen. Congratulations! You've successfully deployed your first .NET application on AWS with AppRunner! 👏🚀👏
Testing the deployment pipeline
The beauty of AWS AppRunner is that every push on your Git repository will automatically trigger the deployment of your service. Let's test it.
Open your app in your favorite IDE. In the Program.cs file change the "Hello World!" text with "Hello, [Your_NAME]":
var builder = WebApplication.CreateBuilder(args);
var app = builder.Build();

app.MapGet("/", () => "Hello, Daniel LAWSON!");

app.Run();
Commit your changes and push them to your remote branch.
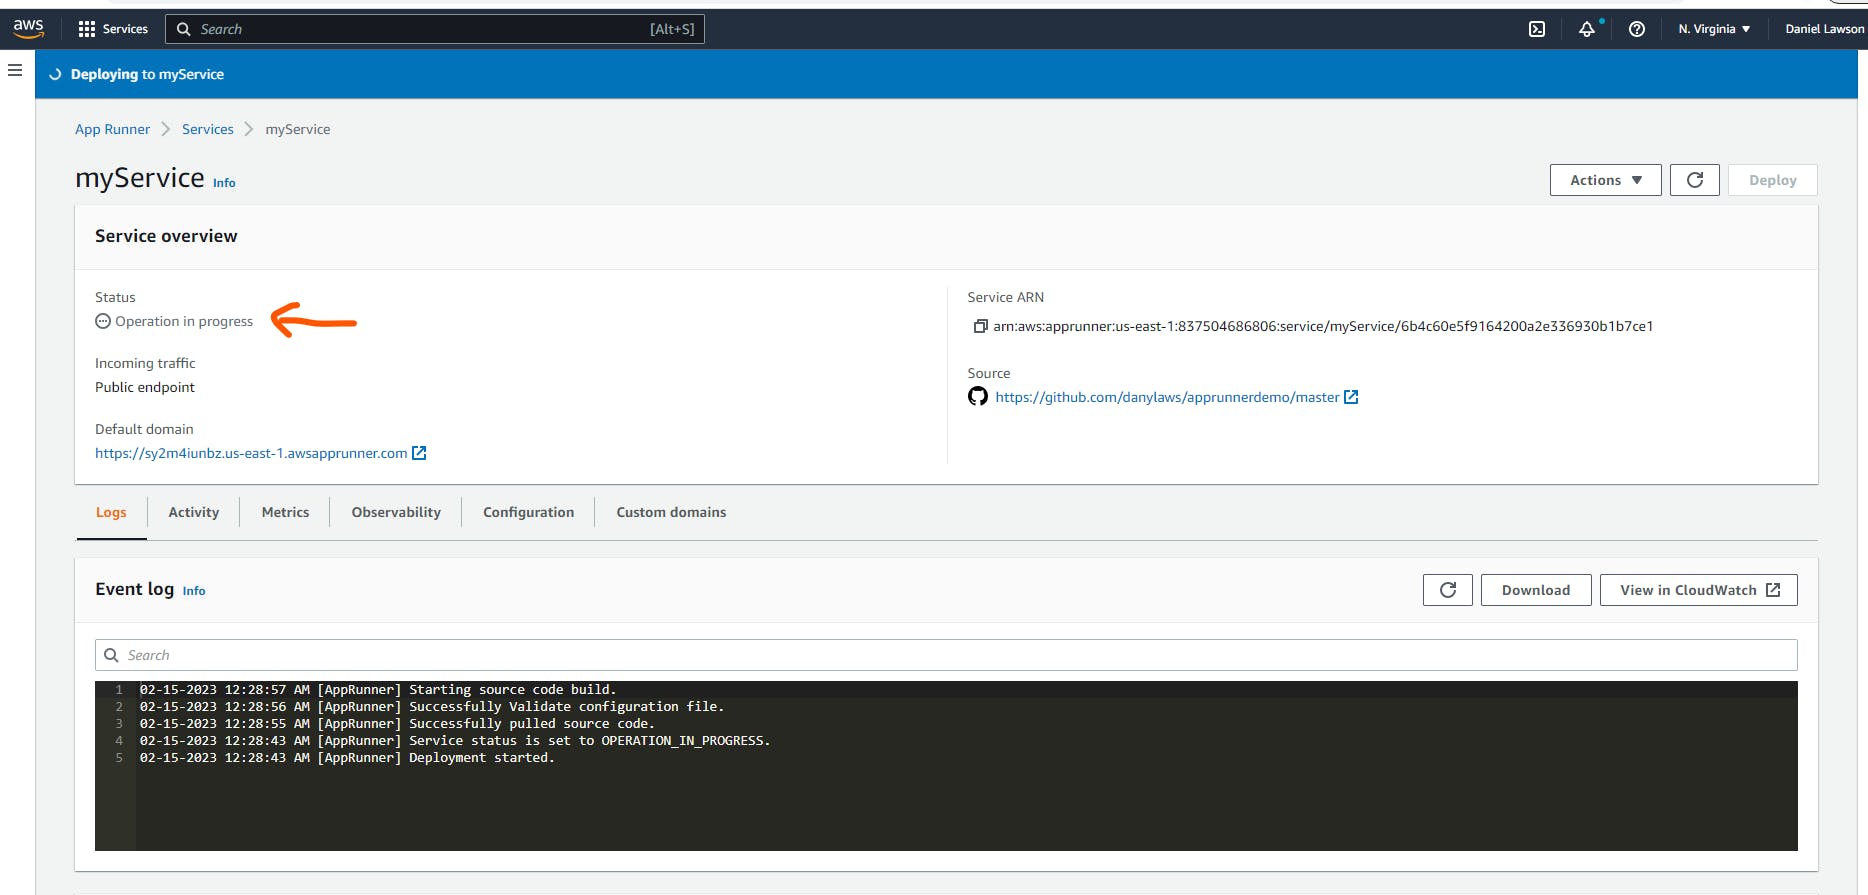
In the AWS Console, you can see that your service is back to "Operation in progress" status. It's because AppRunner detects the changes in your GitHub repository and is trying to redeploy the new version of your app.
Several minutes later, your app should be back up and running again. And, when you click on the domain name, you should see your new message:
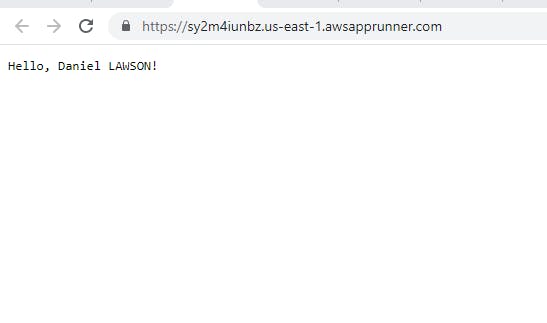
AppRunner successfully redeployed the new version of your app! The internal pipeline is fully operational. Great!
The AWS AppRunner API
We've seen so far that it is pretty simple to deploy an ASP.NET 6 Minimal API on AWS with AppRunner, thanks to the service page in the AWS Console. Under the hood, all the deployment system relies on a very rich API. That means you can also deploy your app directly via the API, with a simple JSON file. Let's try!
⚠️ Warning: You will use the AWS CLI V2. You need to be connected to AWS via your IAM User with programmatic access! Please check the prerequisites!
First, create your JSON file called apprunnerdemo.json. Update the content as below:
{
  "NetworkConfiguration": {
    "IngressConfiguration": {
      "IsPubliclyAccessible": true
    }
  },
  "ServiceName": "myServiceViaApi",
  "SourceConfiguration": {
    "AuthenticationConfiguration": {
      "ConnectionArn": "put your connection Arn here"
    },
    "AutoDeploymentsEnabled": true,
    "CodeRepository": {
      "CodeConfiguration": {
        "CodeConfigurationValues": {
          "BuildCommand": "dotnet publish -c Release -o out",
          "Runtime": "DOTNET_6",
          "Port": "8080",
          "StartCommand": "dotnet out/apprunnerdemo.dll --urls=http://0.0.0.0:8080"
        },
        "ConfigurationSource": "API"
      },
      "RepositoryUrl": "Your code source GitHub repository here",
      "SourceCodeVersion": {
        "Type": "BRANCH",
        "Value": "master"
      }
    }
  }
}
This file has the basic setup necessary for the deployment of your app. The service name is myServiceViaApi. However, one key element is missing: the ConnectionArn parameter. it is the connector to your GitHub account. Without it, AWS cannot connect your code source repository to your AppRunner service. Open your terminal and run the command below:
aws apprunner list-connections
You should have the list of your GitHub connections displayed in the terminal, like this:
{
    "ConnectionSummaryList": [
        {
            "ConnectionName": "apprunnerdemoconnection",
            "ConnectionArn": "arn:aws:apprunner:us-east-1:837568946807:connection/apprunnerdemoconnection/d6ec46398808481fbee126aa1f2e62da",
            "ProviderType": "GITHUB",
            "Status": "AVAILABLE",
            "CreatedAt": "2023-02-12T19:12:31+01:00"
        }
    ]
}
You can see some parameters as the provider type or the status. But the most important here is the Arn (the unique identifier of the connection). Copy the ConnectionArn and replace "put your connection Arn here" in your JSON document. Also, do not forget to set your RepositoryUrl parameter. As the name implies, it is your repository URL on GitHub.
That's it! you are ready to deploy your app. In the terminal, run this command:
aws apprunner create-service \
    --cli-input-json file://apprunnerdemo.json
If your JSON document is valid, you should see an output of your new service in the terminal, similar to this :
 "Service": {
        "ServiceName": "myServiceViaApi",
        "ServiceId": "cb41a72c021d747fd846f232cab26f5",
        "ServiceArn": "arn:aws:apprunner:us-east-1:837504686ç06:service/myServiceViaApi/cb41a72c02d747fd8445232cab2de6f5",
        "ServiceUrl": "ptcrndgjhe.us-east-1.awsapprunner.com",
        "CreatedAt": "2023-02-15T01:33:17.961000+01:00",
        "UpdatedAt": "2023-02-15T01:33:17.961000+01:00",
        "Status": "OPERATION_IN_PROGRESS",
        "SourceConfiguration": {
            "CodeRepository": {
                "RepositoryUrl": "https://github.com/danylaws/apprunnerdemo",
                "SourceCodeVersion": {
                    "Type": "BRANCH",
                    "Value": "master"
                },
                "CodeConfiguration": {
                    "ConfigurationSource": "API",
                    "CodeConfigurationValues": {
                        "Runtime": "DOTNET_6",
                        "BuildCommand": "dotnet publish -c Release -o out",
                        "StartCommand": "dotnet out/apprunnerdemo.dll --urls=http://0.0.0.0:8080",
                        "Port": "8080"
                    }
                }
            },
            "AutoDeploymentsEnabled": true,
            "AuthenticationConfiguration": {
                "ConnectionArn": "arn:aws:apprunner:us-east-1:738504687807:connection/apprunnerdemo/acdhy91e8b626138b93496cbfe2fd1a0"
            }
        },
        "InstanceConfiguration": {
            "Cpu": "1024",
            "Memory": "2048"
        },
        "HealthCheckConfiguration": {
            "Protocol": "TCP",
            "Path": "/",
            "Interval": 5,
            "Timeout": 2,
            "HealthyThreshold": 1,
            "UnhealthyThreshold": 2
        },
        "AutoScalingConfigurationSummary": {
            "AutoScalingConfigurationArn": "arn:aws:apprunner:us-east-1:837504686806:autoscalingconfiguration/DefaultConfiguration/1/00000000000000000000000000000001",
            "AutoScalingConfigurationName": "DefaultConfiguration",
            "AutoScalingConfigurationRevision": 1
        },
        "NetworkConfiguration": {
            "EgressConfiguration": {
                "EgressType": "DEFAULT"
            },
            "IngressConfiguration": {
                "IsPubliclyAccessible": true
            }
        }
    },
    "OperationId": "0b7c648f96cc5f758af536cf97ad7d0a"
}
Notice that your service is in "OPERATION_IN_PROGRESS" status, meaning AppRunner is deploying your app. Wait a couple of minutes and check your service again. To do so, copy your ServiceArn value and run the command below:
aws apprunner describe-service --service-arn [Your service Arn here]
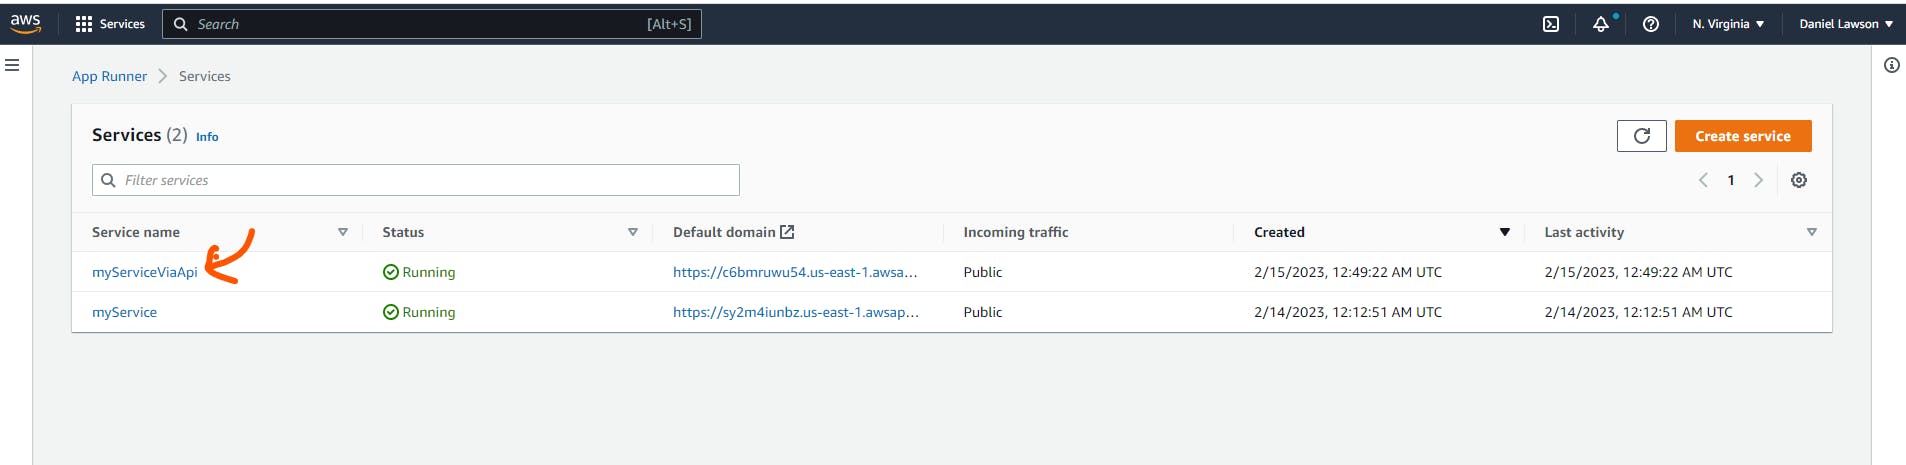
The status should be now "RUNNING". In the AWS Console, notice the brand new myServiceViaApi:
There are a lot of other operations you can do via the CLI. Here is the full documentation about the AppRunner API.
Conclusion
In this article, You've learned what AWS AppRunner is, and how you can use it to deploy an ASP.NET 6 application. Also, you see the power of the AppRunner API, by deploying your app via a JSON config file. Even though our build/run configurations were pretty basic in this article, there is a possibility to define a more complex run process via a separate apprunner.yaml config file at the root of your project. If you are a developer, AppRunner can be a great tool to consider when you want to deploy your .NET Apps on AWS in a fully managed way!
I hope you like this article. Do not hesitate to leave feedback or a comment. if you have any questions about this article, feel free to ask as well. Thank you!