

![How to deploy an ASP[.]NET Core Web App on AWS with Elastic Beanstalk](https://cdn.hashnode.com/res/hashnode/image/upload/v1656933727527/_1cwFCJ9q.jpg?w=1600&h=840&fit=crop&crop=entropy&auto=compress,format&format=webp)


Back in 2020, I was a complete newbie in cloud computing and in AWS specifically. I was searching for a way to deploy my ASP[.]NET Core app on a virtual machine in the cloud. Then I discovered a service that saved my life: Elastic Beanstalk.
In this article, we'll talk about what is Elastic Beanstalk and how it works. Then, we'll explore a way to deploy a simple web app on an EC2 instance on AWS. Let's go! 🚀🔥
What is Elastic Beanstalk?
Elastic Beanstalk (EB for short) is defined by AWS as an easy-to-use service for deploying and scaling web applications and services on AWS. It can deploy apps written in a variety of languages (Python, PHP, Go, .NET, etc ...) on a variety of servers (Apache, Nginx, IIS, etc ... ). AWS designed it to be the simplest and the fastest way to deploy apps on AWS. Elastic beanstalk will help to provide deployment details for you, such as the server capacity, memory, operating system, etc ... and deploy your application in that environment without bothering with the underlined infrastructure configuration. From a developer's point of view, I found the service very useful and I decided to rely on it as my deployment method in the early beginning of a membership management app project, back in 2020. I've talked a bit about the project in this article. I want to point out a couple of benefits that EB brings to my project. This is not an exhaustive list. It can be much more, depending on the project, but I want to enumerate two :
- Simple to begin with
As a pure software developer and an AWS newbie, a lot of concepts were pretty new for me at the beginning, such as VPC, Subnets, Security Groups, IAM Roles and permissions, etc ... Leverage all the configurations manually would have been really painful for me. Thankfully, this "automatic" side of Elastic Beanstalk helped me out.
- The resources created are still under control
Even though EB hides a lot of complexity when deploying apps, every single service deployed is still available and under full control. The environment is not a black box. you can have access to the EC2 instance and its characteristics, to the VPC, security groups, and so on ... We are aware of every aspect of our AWS infrastructure. Trust me, it's very important when it comes to cost optimization 💰💸. For more information about Elastic Beanstalk, see the official AWS service description page. Also, here is a Twitter thread I made on the topic :
Enough said. Let's dive into a concrete example of deployment with Elastic Beanstalk.
Elastic Beanstalk by example
The use case is pretty simple here: We'll deploy an ASP[.]NET Core 3.1 app on a Windows Server which runs on IIS. The project is a simple To-Do app with a MySQL database. The database will be deployed on an RDS MySQL instance as well. We won't discuss a lot about the app here, as the aim of this article is the deployment on AWS. I assume you have a good knowledge of app development with .NET Core, and also a basic knowledge of AWS. However, the app code source is available on Github. You will need to have an AWS account as well if you want to try it along. We'll go through a step-by-step guide. From now till the end of this article, you should see a (very) lot of screenshots 📸. Let's go.
Step 1: Install and configure the AWS Toolkit
In this article, I will be using Visual Studio 2022 Community Edition as my IDE. AWS Toolkit is an extension for Visual Studio, that helps to develop and deploy .NET apps on AWS. The IDE choice is not so important here, as AWS Toolkit exists for Rider or VS Code as well. So, you are free to stick with your preferred IDE. The AWS Toolkit for Visual Studio is available at this link: aws.amazon.com/visualstudio.
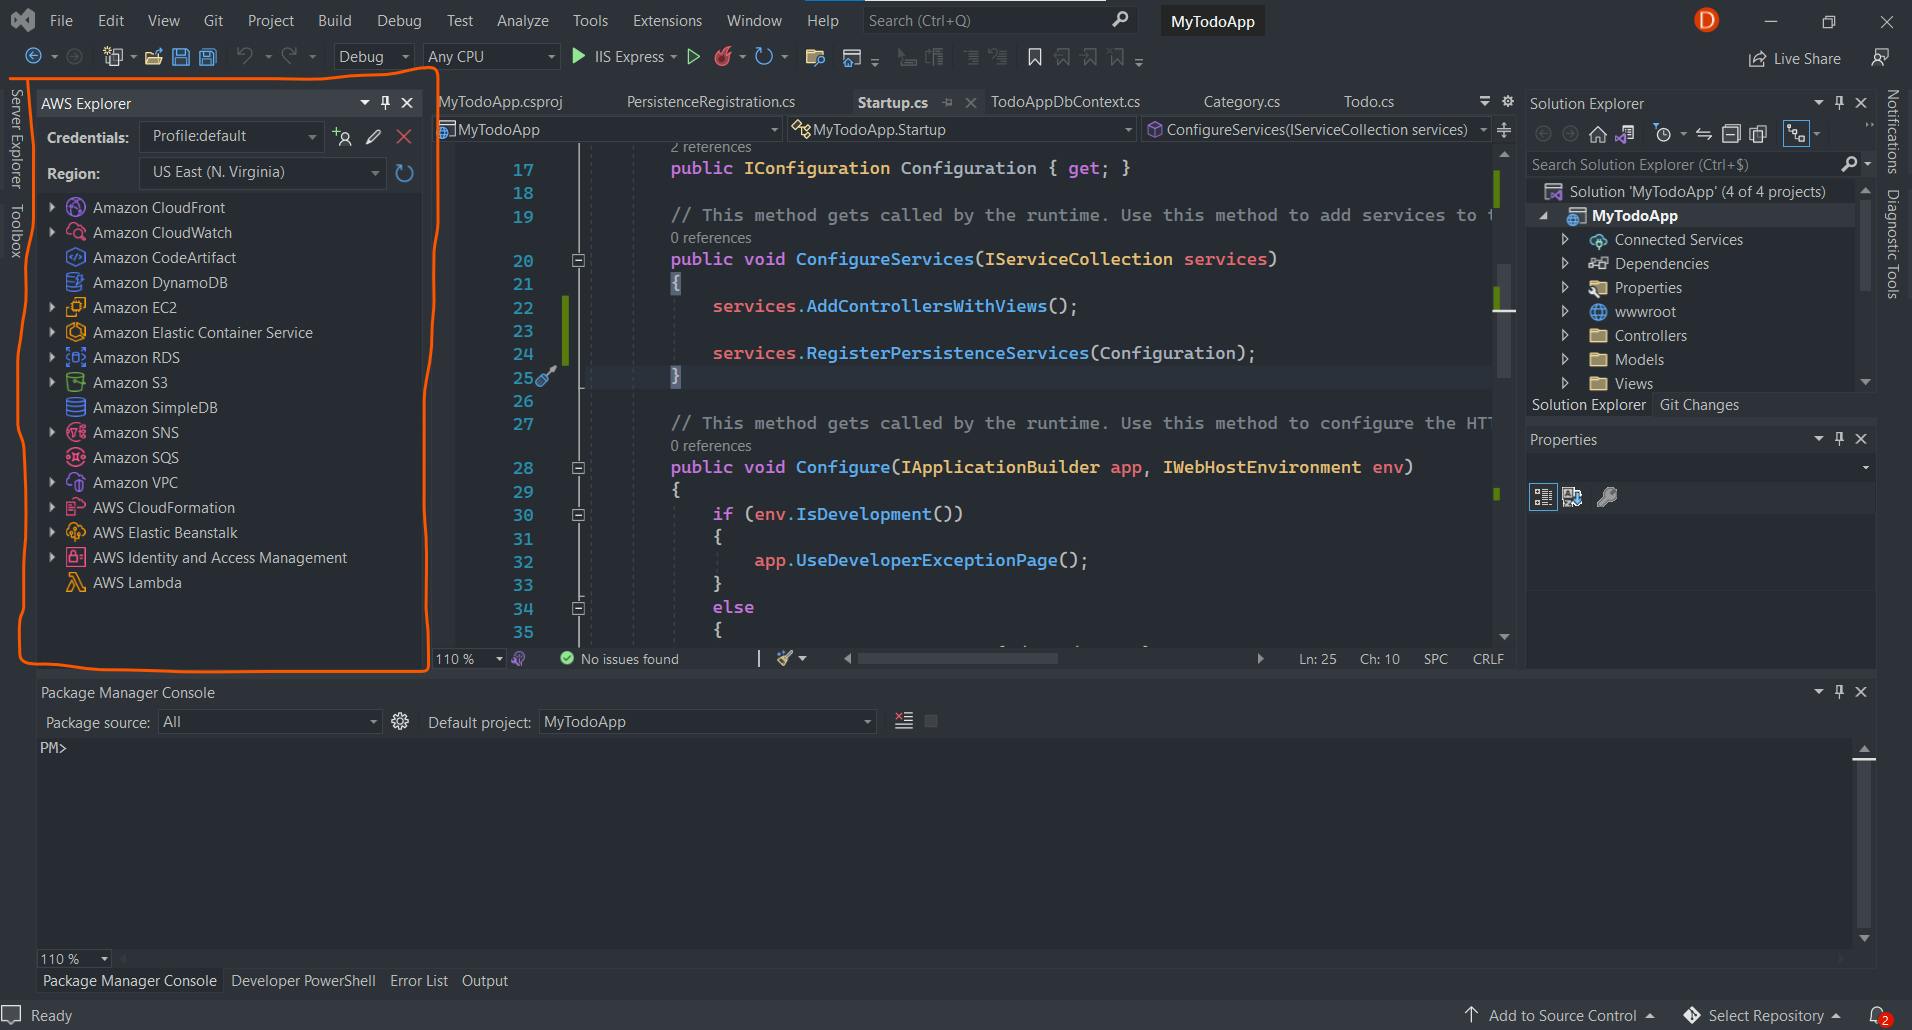
After that you installed the AWS Toolkit, you should see it in the extensions tab of your visual Studio. Also, in the **View ** tab, you have now the AWS Explorer option in the menu. When clicking on it, the AWS Explorer box is displayed, as shown in the screenshot below :
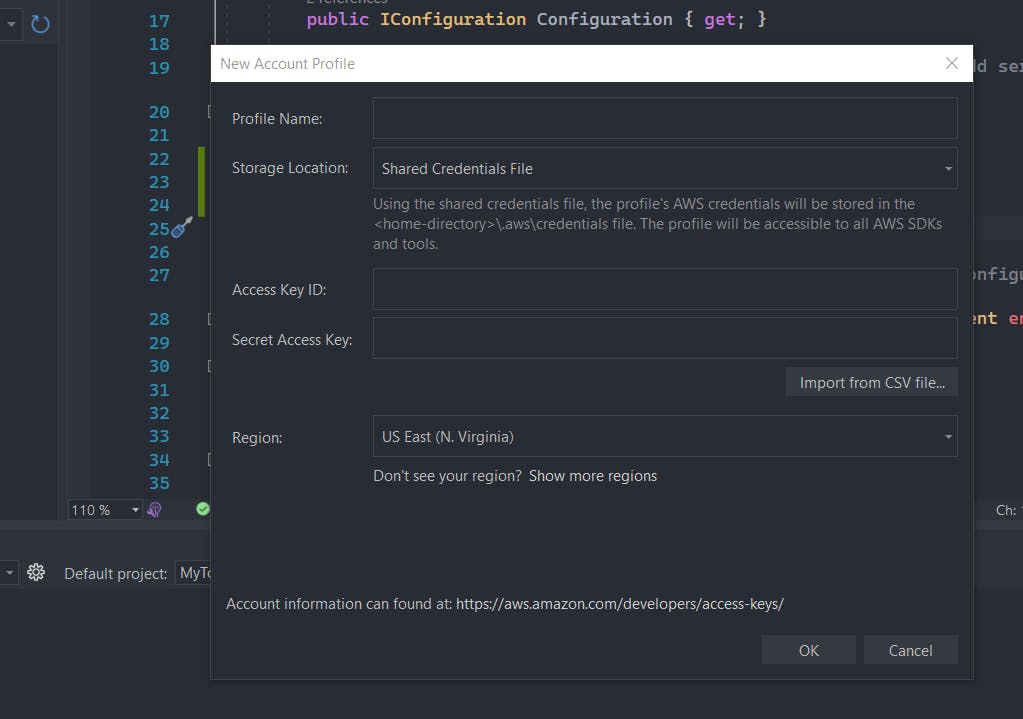
Now, you need to connect the AWS Explorer to my AWS Account, by adding your AWS credentials (Access Key and Secret access key) got from the AWS console :
Step 2: Create the database
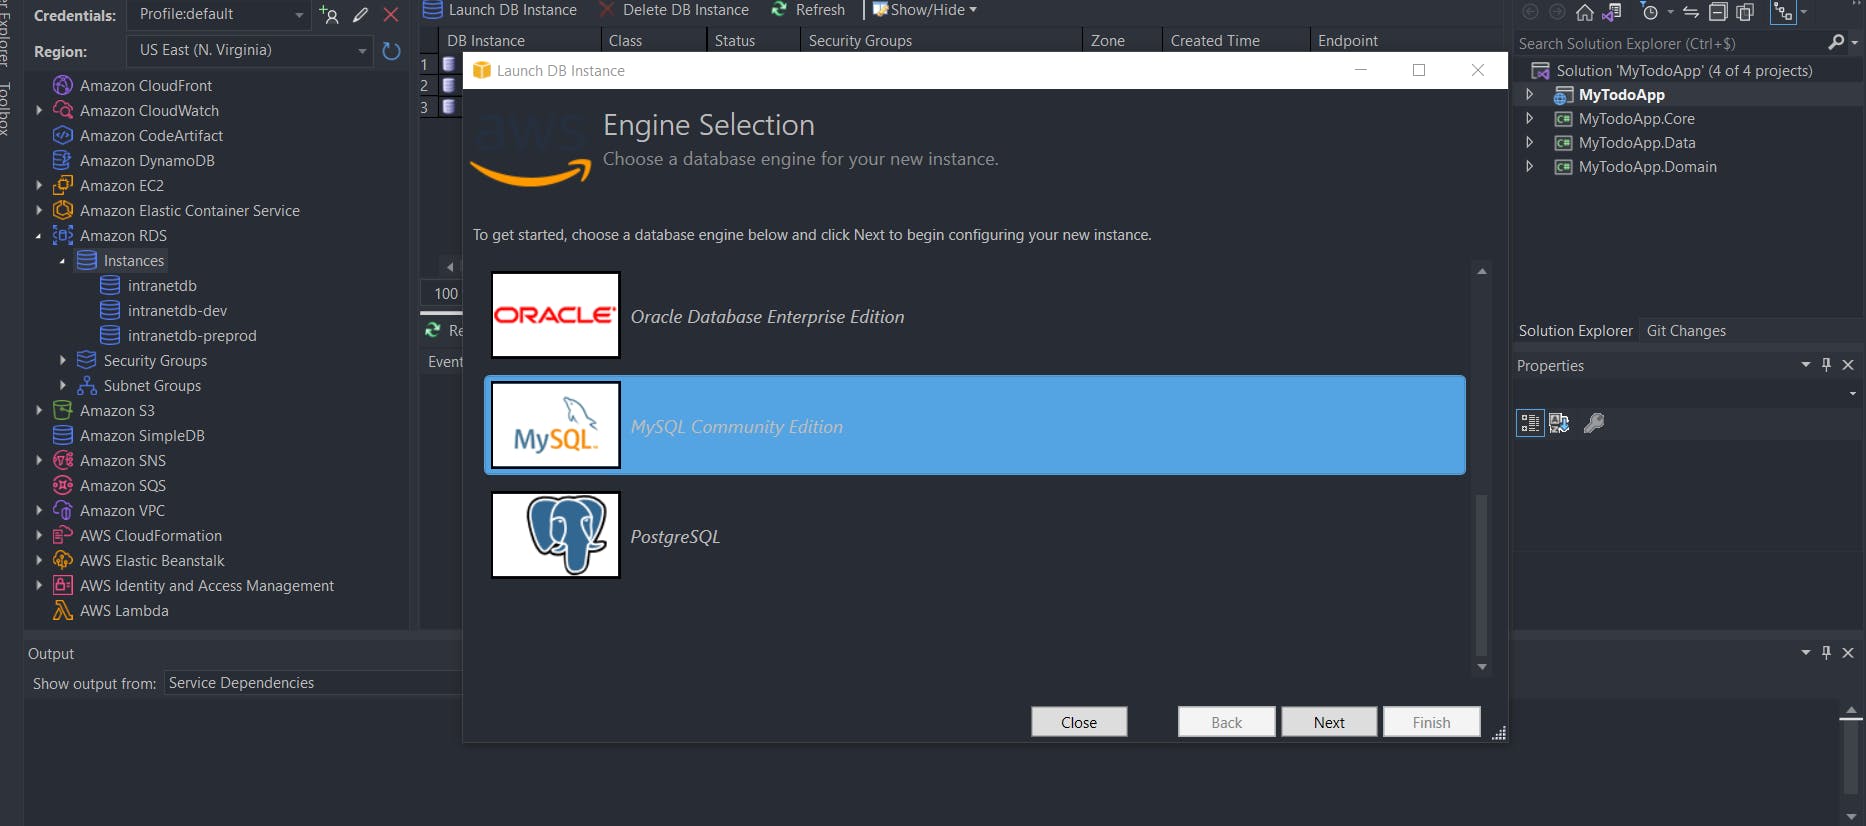
Right into Visual Studio, let's create the database instance for the app. In the AWS Explorer, click on "Amazon RDS > Instances" and choose "Launch DB instance". Select the MySQL Community Edition engine and click "Next".
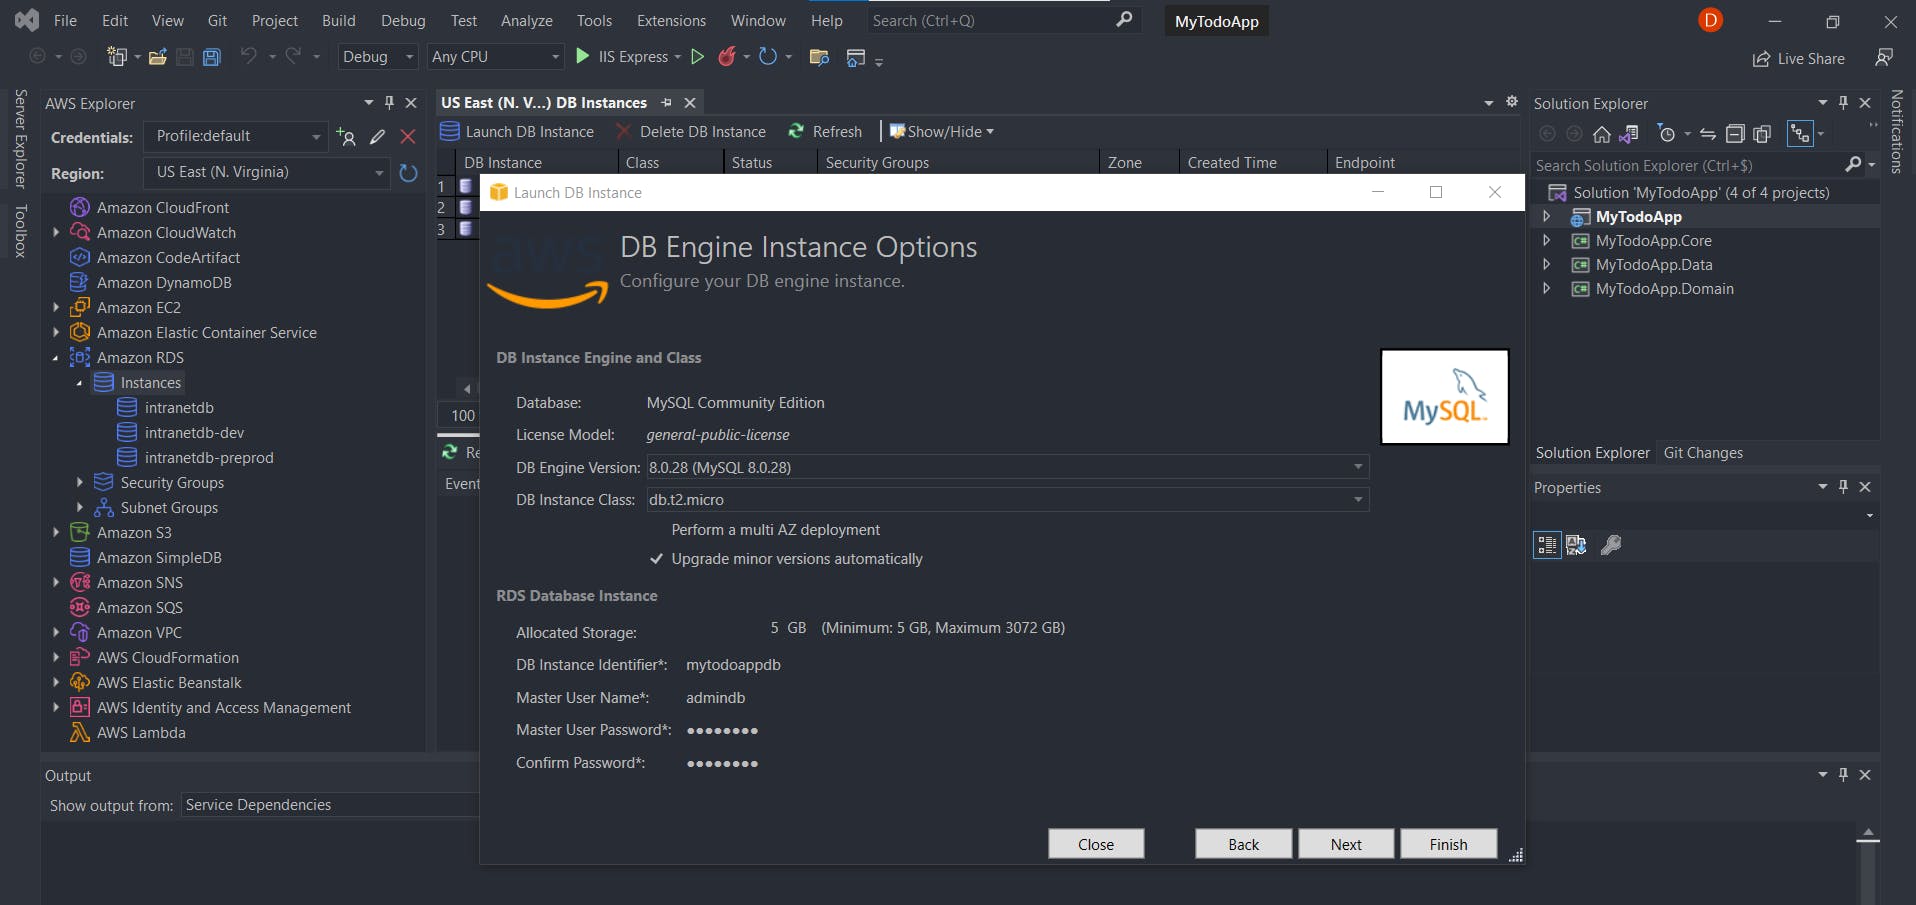
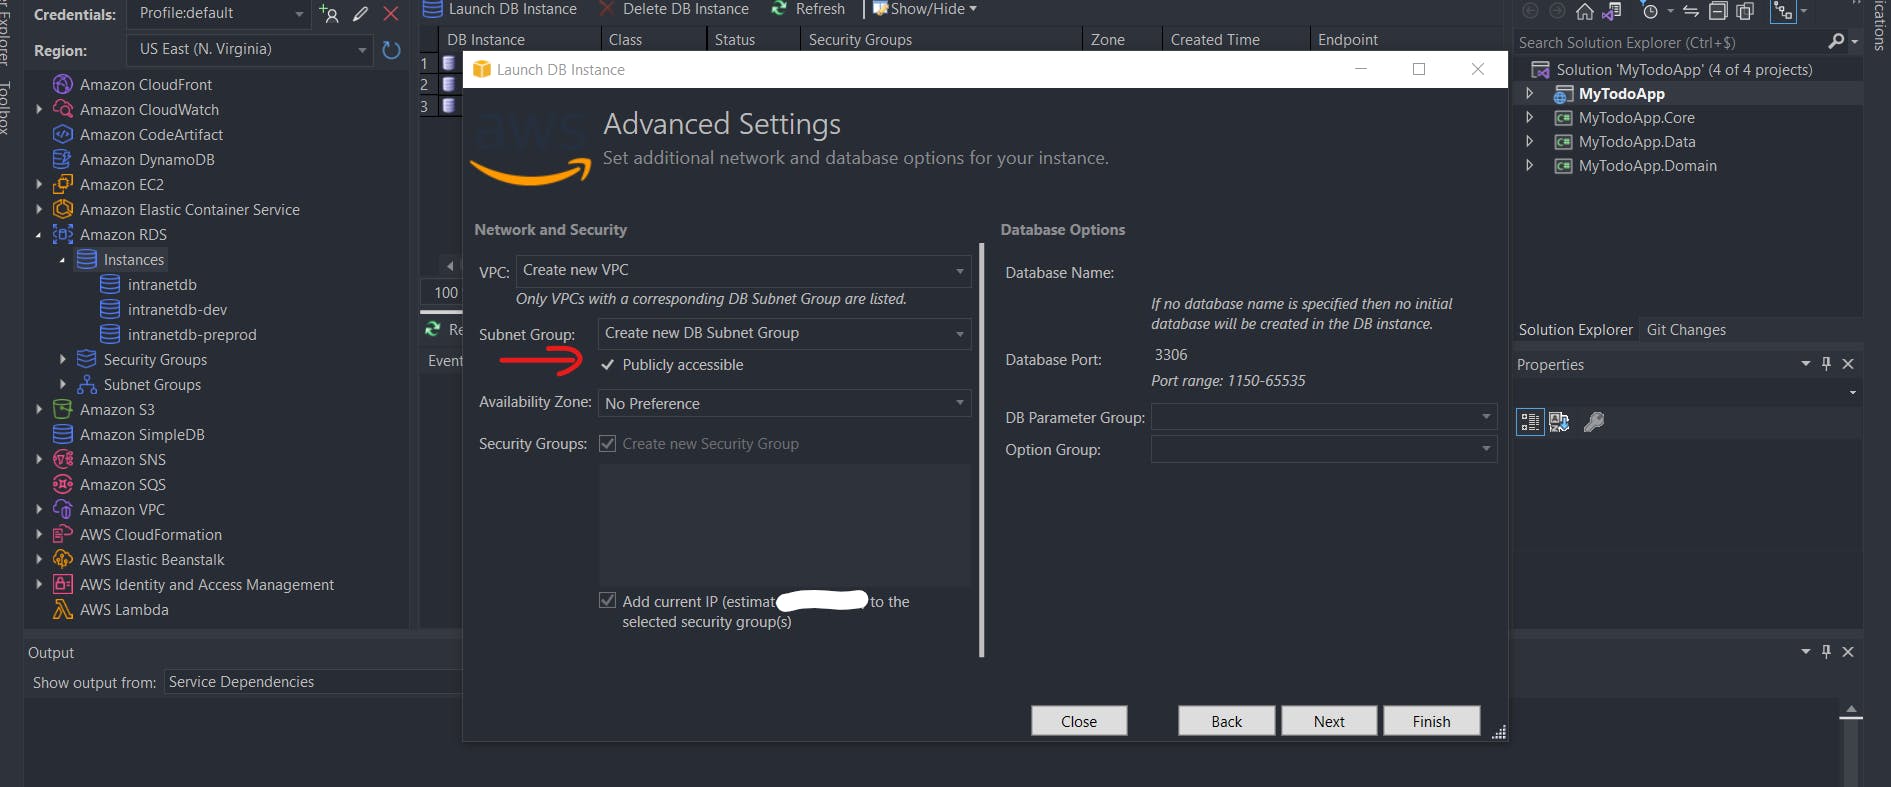
We need to configure our DB Instance by supplying a set of parameters (DB Engine version, name, user credentials, etc ...) as shown below.
The next page is also a settings page. One of them is important though: Be sure to make the database publicly available outside of AWS. Also, make sure your IP address is added to the security group route table by checking the box at the bottom. If it's not checked, your app cannot connect to the database later.
The next page is for setting backup. We don't need it for this demo. But it's a feature that is definitely great for a real-world project. This leads us to the final review page. Click "Launch" to create the database. It should take several minutes for the creation to be complete. The instance status should be firstly on "creating" mode, and once everything is complete, it should become "available".
Step 3: Test the connectivity to the database
Let's test if we can reach our DB instance by running a migration from Visual Studio. First, I set the connection string, named AWSDbConnection, in the appsettings.json file:
"ConnectionStrings": {
    "LocalDbConnection": "server=localhost;database=todoappdb;user=root",
    "AWSDbConnection": "server=mytodoappdb.cgdnqlyjldzo.us-east-1.rds.amazonaws.com;database=mytodoappdb;user=admindb;password=my-PasSw0rD"
  }
Please notice that the server value here is the DB instance endpoint, displayed in the AWS Explorer, in the Amazon RDS menu.
I make use of the connection string in the connection builder:
var connectionBuilder = new MySqlConnectionStringBuilder(
                configuration.GetConnectionString("AWSDbConnection"));

            services.AddDbContext<TodoAppDbContext>(options =>
                    options.UseMySql(connectionBuilder.ConnectionString));
Now, test a connection to the DB instance. To do so, run a migration script from Visual studio, via the Package manager Console :

If no error occurred, that means you have successfully created and updated your MySQL database instance! 👏👏
⚠️⚠️⚠️ Caution: It's a security breach to store secrets like database strings in the appsettings.json file. Services like AWS Systems Manager Parameter Store can help to store sensitive data. Then you can refer to them in the app code securely, as the service encrypts the data. Don't know how to manage your secrets with AWS Systems Manager? No worries! I wrote an article about the topic.
Step 4: Let's deploy! 🚀
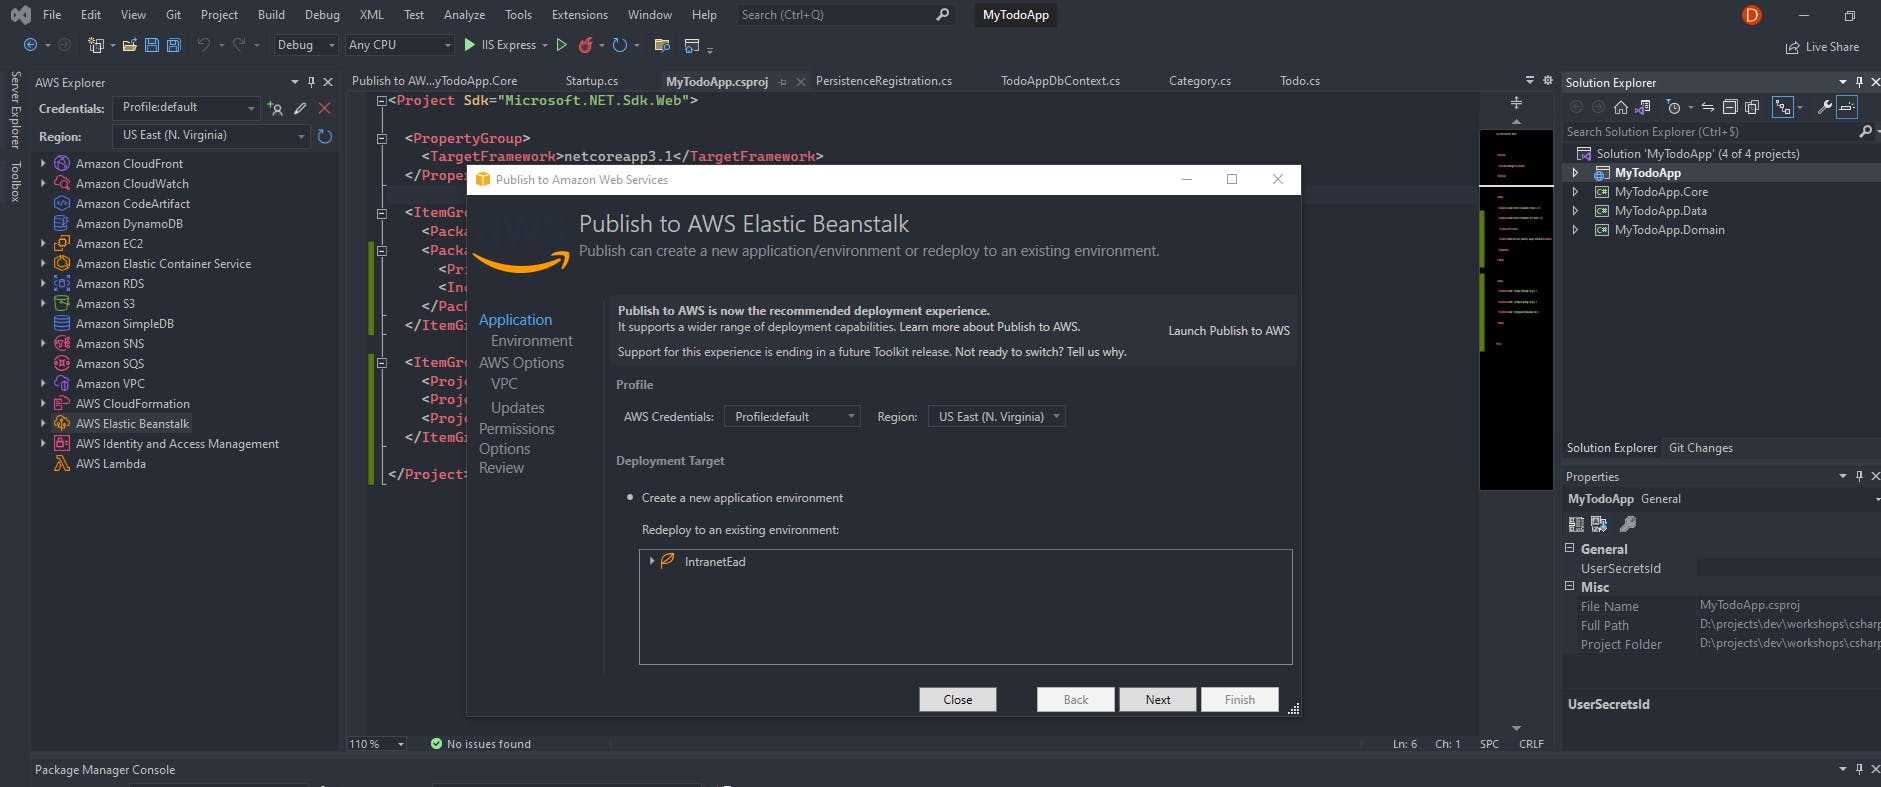
After creating the RDS instance, you should now be able to deploy your app. Right-click on the web project > Publish to AWS Elastic Beanstalk. Since it is the first time deploying the app, click on "Create a new environment" and then click Next.
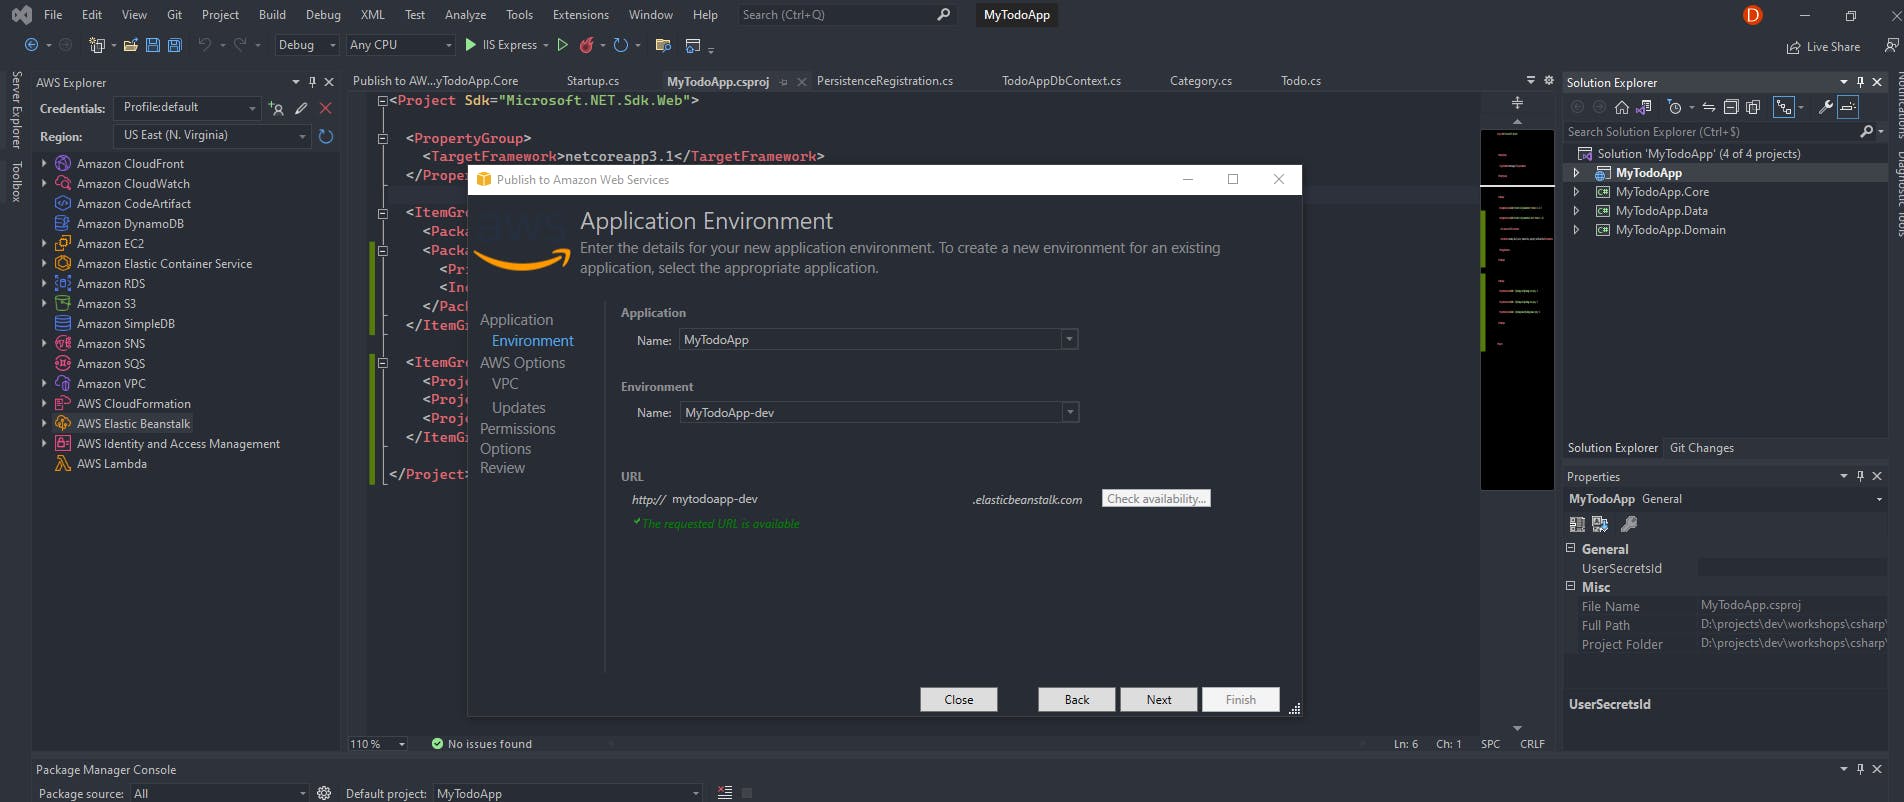
Next, choose a name for the app and for the environment. One notice though, the app URL needs to be unique. Then click Next.
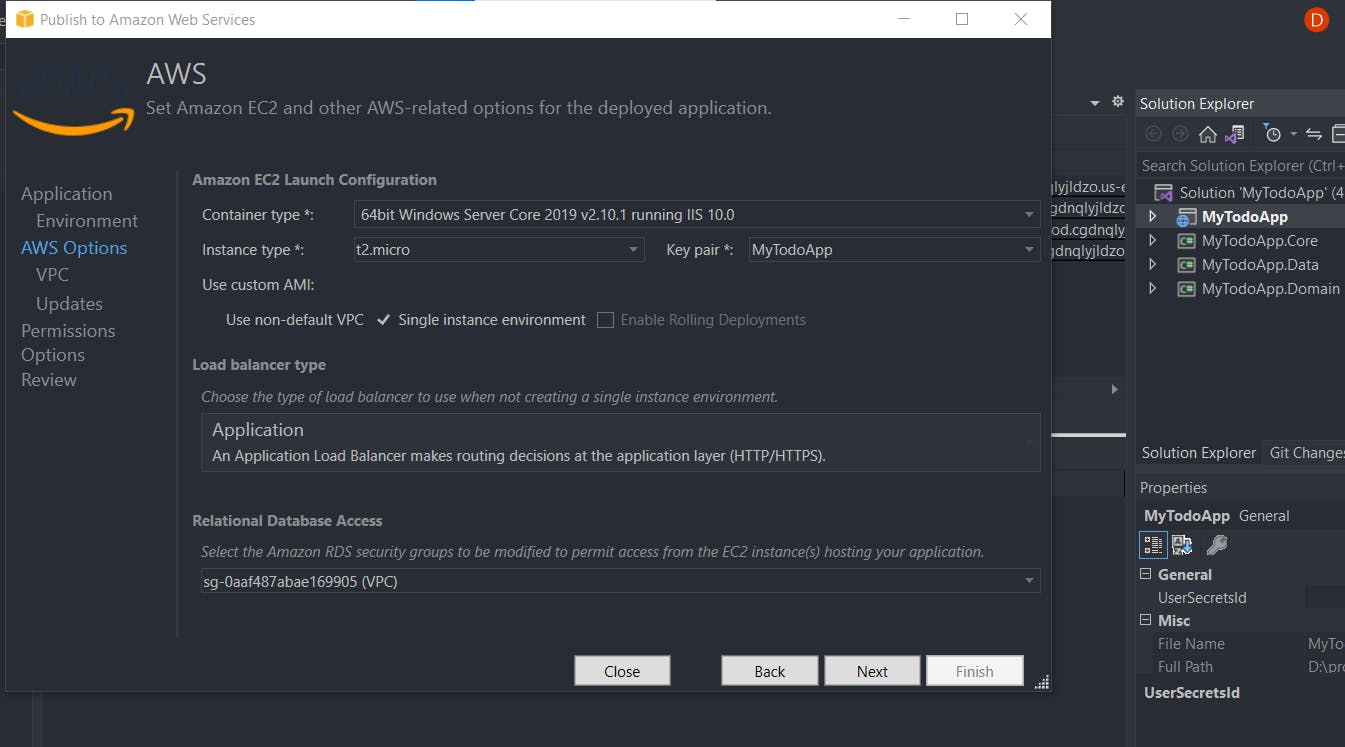
Here is the most important part of our deployment. We need to select the EC2 instance type. As mentioned earlier, you will deploy on a server running IIS and ASP[.]NET Core 3.1. So the EC2 type is chosen accordingly. For the instance, choose the t2.micro type as it's eligible for the AWS Free Tier plan. If you want to know more about the AWS Free Tier plan, I've made a Twitter thread:
Also, do not forget to create a Key Pair. After that, you need to check the "Use non-default VPC" box. It gives you the possibility to select the same VPC for the database instance on the next page. Finally, we need to select our database instance in the dropdown list at the bottom. It's an important step that will allow the app to connect to the database without additional configuration work.
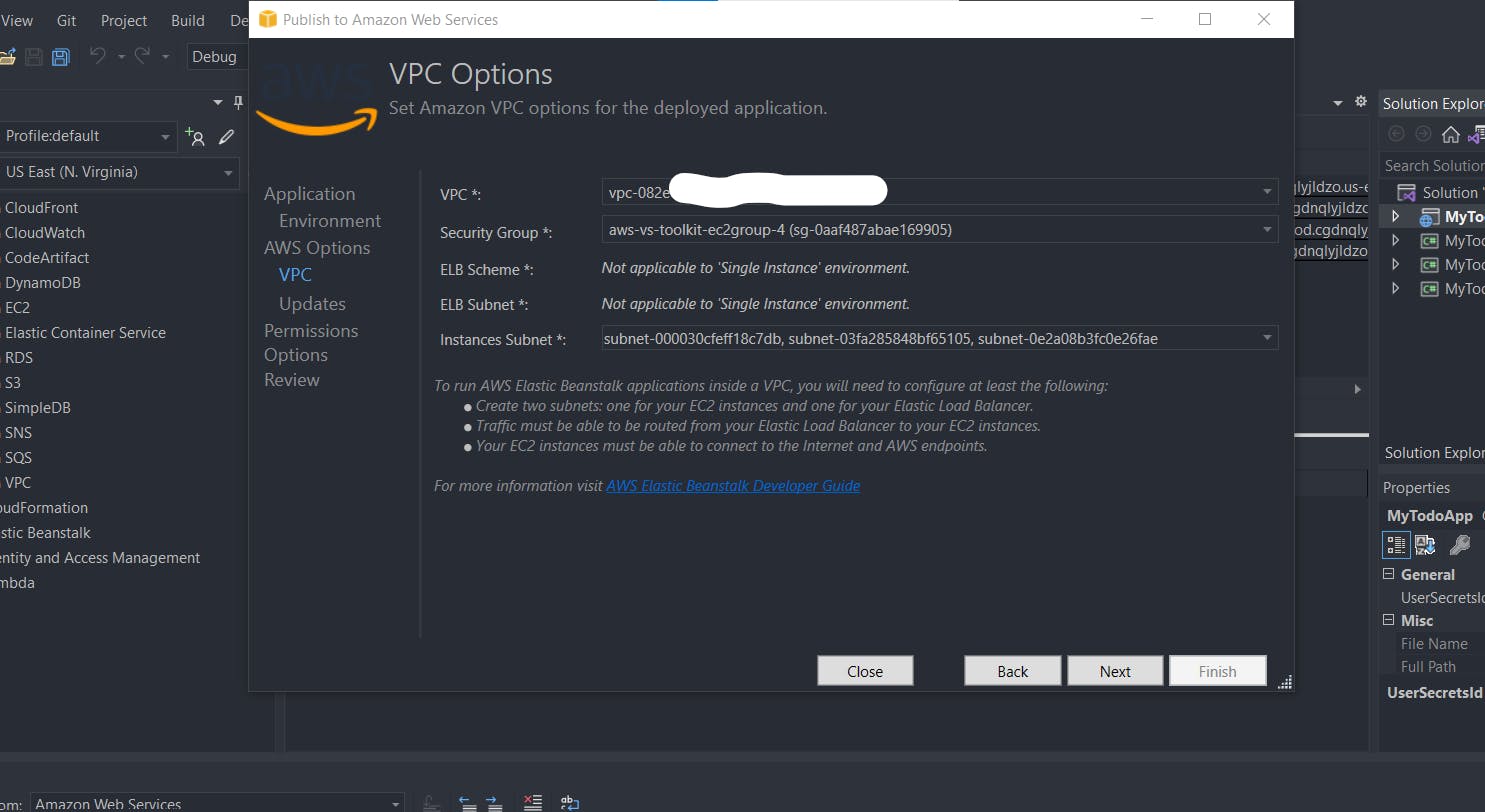
The next page is for the VPC options. If you did not create anyone before, we should have only one choice in the VPC dropdown list. Otherwise, you'll need to search for the same VPC and Security Group as the DB instance. you can find it in the AWS Console, in the instance parameters.
After that, you need to select at least one subnet in the "Instance Subnets" list. Here I've selected three:
Next is the permissions page. You need to create a role that will grant Elastic Beanstalk access to AWS resources on your behalf. Personally, I attach policies to this role according to which AWS resource I need in my app. For example, if my app needs to send emails, I will attach the AmazonSESFullAccess policy, and so on. But for the purpose of this demo, you can just attach the PowerUserAccess policy, which will provide full access to all the resources, except users and group management. If you don't know how to attach a policy to a role in the AWS Console, please refer to the IAM documentation.
After the last review page, we can finally click on the "Deploy" button. EB will take several minutes to launch the app. It can be quite long (up to 10 minutes), so don't be in a hurry 😀
When everything goes well, you should see the deployment status and your brand-new environment in the list, as shown below:
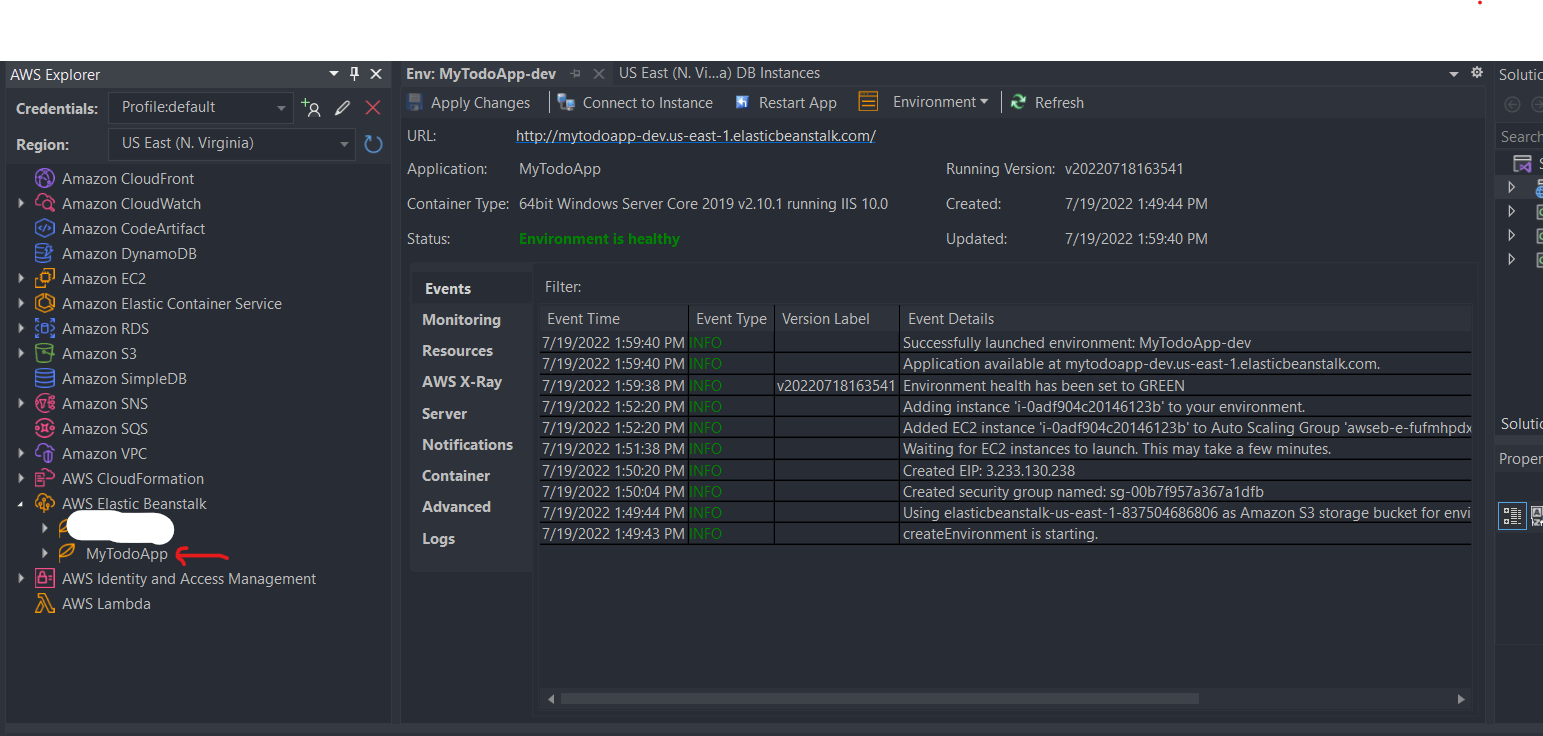
Congratulations! You have deployed your first ASP[.]Net Core app on AWS! 👏👏👏 You can click on the URL to try your app live from the cloud. As we can see below, our app is properly deployed:
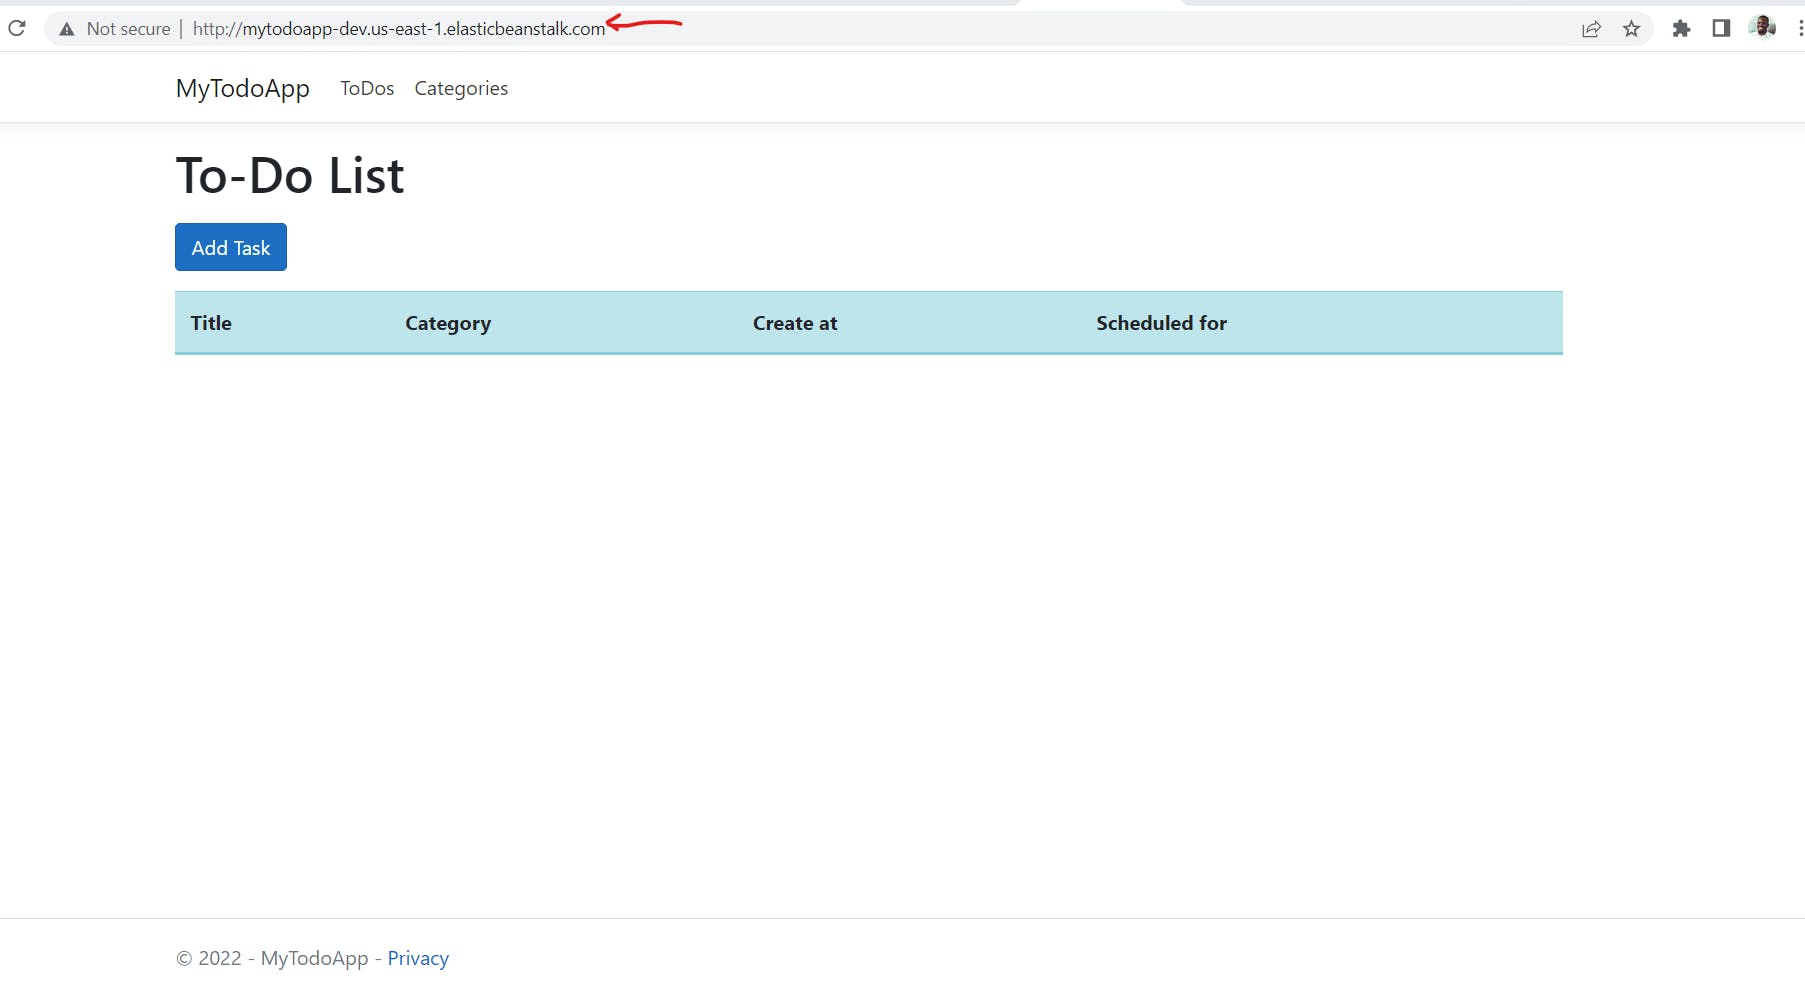
Thanks to Elastic Beanstalk, you have deployed a fully functional ASP[.]Net core App + Database, all on AWS. All the necessary resources were launched for you. Great! And as I said earlier, you still have full control over those resources. You can change your EC2 or DB instances type, stop or delete them, etc ...
After this step-by-step guide, you'll need to free up all the resources created. Otherwise, you'll face unexpected costs from AWS! Connect to your AWS Console and delete :
The EC2 instance
The RDS instance
The VPC and the subnets
Elastic Beanstalk environments
S3 buckets
etc ...
I hope you like this article, and I hope it gives you a good taste of app deployment on AWS. Do not hesitate to leave feedback or a comment. Also, if you have any questions about this article, feel free to ask as well. Thank you!